Steps for Unrooting the Rooted Android devices manually.

Hello Everyone! Welcome to flash stock ROM. Today, I’m providing you the detailed post which will include the detailed sequential steps to be followed to Unroot the already rooted devices of your Android devices. Sit back and enjoy the post, feel free to drop any comments or queries if any.
We are living in a world of smartphones these days and Android takes a major part of it. Android, a reason of relief for most of the Smartphone users of the world. Being an open source, it has let us do almost everything from our end to have control on all required things. Gaining root access, installing stock ROM, Custom ROM and what not! This is the main reason why we don’t settle up with one system recovery on our device. We keep jumping from one to another.
But, sometimes you might think to roll back to the initial state for any reason be it be, such as claiming the warranty of the device or to receive the OTA updates or anything. I have mentioned some of the popular steps to do the same.
I will let you know the two popular and easy ways to do that.
Method 1: By using Root file browser:
Step 1: Search for Root browser application in Playstore and download and install the same.
Step 2: Browse for the options /System and then find for /bin and open it.
Step 3: Now, find a file with the name “su”, this is the mail file which also shows that the device is rooted, find for the same and then select and delete the same. If you are not able to find, even then it is ok, just go to the further steps.
Step 4: Now browse to /system and then to /xbin and search for the same su file and delete from there too.
Step 5: If you have followed all these steps
![Screenshot_2016-07-19-09-12-28[1]](http://www.rootdroids.com/wp-content/uploads/2016/07/Screenshot_2016-07-19-09-12-281-e1468900543281-182x300.jpg)
, then you are almost done. Now, search for the Superuser.apk application in /system and then in /app folder and then delete it.
Step 6: Now exit everything and restart the device. The device should be able to work properly as it was during the unrooted time.
Method 2: Using Applications
This is another easier way to unroot the device just by running a playstore application. It does all the work for you manually and helps you get your device unrooted successfully. Search for the Ginger unroot application in playstore and then install the same and run to get this done.
Method 3: By Superuser App
Note: only applicable if the Custom recovery is not installed on the device.
Step 1: Open Superuser app and go to settings.
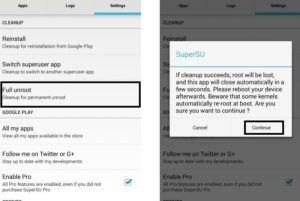
Step 2: Browse for full unroot option and hit it.
3: Hit on continue option to confirm.
4: Wait for some time for the process to complete, and then reboot the device and use.
Method 4: By installing stock firmware
Note: This is applicable only if the device is installed with custom recovery.
I have already written detailed posts regarding this, just search for here.
Method 5: OTA update
Step 1: Go to settings ->About device -> Software update. If you are able to get any updates available for your device, then download it.
Step 2: The device also gets rebooted once the updates are installed. Wait for some time.
Step 3: Now, reboot the device to the recovery mode.
Step 4: Open command prompt and then enter the below shown commands.
Steps 5. Type the following command and hit the Enter key:
adb shell
Steps 6. You will see “#”. Now type this:
su

Steps 7. If you get “permission denied” or something like that as result, your device has been successfully unrooted.
Steps 8: Uninstall the Superuser app from your phone and reboot the device.
I hope the post came in handy for the flashing. If you are facing any issues in following any of these steps, then feel free to drop a comment. One of us from our team will get back to you quickly. Also, go through the other posts as well. Thanks!
Editor’s Choice
Flash Stock Rom on Verykool S353 Jasper
Equipped with a Bachelor of Information Technology (BIT) degree, Lucas Noah stands out in the digital content creation landscape. His current roles at Creative Outrank LLC and Oceana Express LLC showcase his ability to turn complex technology topics into engagin... Read more