In this guide, we’ll explore how to root Huawei Mate 40 Pro using Magisk patched boot.img. While devices from this manufacturer typically don’t see much custom development, they’ve carved out their own niche. Recently, the popularity of the Huawei Mate 40 Pro has seen a steady rise, particularly among tech experts looking to root Mate 40 Pro for enhanced functionality and customization. Read More – Does Rooting or Unlocking Void Your Android Phone Warranty
Nonetheless, there is one crucial step you need to fulfil before you can successfully root Huawei Mate 40 Pro – ensuring your bootloader is unlocked. Once this prerequisite is met, you can start exploring various modifications. You can flash custom recoveries like TWRP or custom ROMs such as LineageOS. More so, you can even gain administrator privileges! With an unlocked bootloader, the process to root Mate 40 Pro becomes a lot more straightforward and accessible Read More – 30 Amazing Things You Can Do After Rooting Your Android
Why are we waiting? Let’s get into business.
Table of Contents
Understanding the Pros and Cons of Rooting Huawei Mate 40 Pro
When you decide to root your Huawei Mate 40 Pro, it’s essential to know what you’re getting into. Rooting has its advantages, but it also comes with certain risks. Let’s take a closer look at the pros and cons of rooting your device.
Pros of Rooting Huawei Mate 40 Pro
1. Full Control Over Your Device: Rooting your Mate 40 Pro allows you to have full administrative control over your device. This means you can customize your device as you wish.
2. Improved Performance: After you root the Mate 40 Pro, you can optimize its performance, increasing its speed and battery life.
3. Access to More Apps: Rooting gives you access to a variety of apps that are not available to non-rooted devices.
Cons of Rooting Huawei Mate 40 Pro
1. Voiding Your Warranty: One major downside of rooting is that it typically voids your device’s warranty. Thus, any issue you encounter after rooting will not be covered.
2. Risk of Bricking Your Device: If the root process is not done correctly, there’s a risk of “bricking” your device, i.e., rendering it unusable.
3. Increased Vulnerability to Malware: Since you remove the protections put in place by the manufacturer when you root your device, your Mate 40 Pro may become more vulnerable to malware and viruses.
In conclusion, while there are many advantages to rooting your Huawei Mate 40 Pro, it’s essential to consider the potential downsides. Make sure you understand the risks before deciding to root your Mate 40 Pro.
How to Root Huawei Mate 40 Pro using Magisk Patched Boot.img
In an effort to streamline the process of how to root Huawei Mate 40 Pro, we have broken down the instructions into distinct sections. It’s crucial that you adhere to these steps precisely, leaving none out. Please be aware that we cannot be held accountable for any potential damage to your phone or loss of data while you root Mate 40 Pro. Always proceed with caution. Read More – The First 10 Things to Do After Rooting Your Device
Step 1 : Install Android SDK

Firstly, to root Huawei Mate 40 Pro, it is imperative to install the Android SDK Platform Tools on your computer. As many tech enthusiasts might already know, this is the officially recommended ADB and Fastboot binary supplied by Google for this procedure. Simply download it and extract it to a location on your PC that best suits your needs. This extraction will generate the ‘platform-tools’ folder, a critical component in the process to root Mate 40 Pro.
Step 2 : Enable USB Debugging and OEM Unlocking on Huawei Mate 40 Pro
To initiate the process to root Mate 40 Pro, it’s crucial to activate USB Debugging and OEM Unlocking. By enabling OEM Unlocking on your Mate 40 Pro, your device becomes identifiable by your PC in ADB mode. This significant step paves the way for you to boot your device into Fastboot Mode, a necessary stage when you aim to root Mate 40 Pro.
Here’s how you gonna do that. : Enable USB Debugging and OEM Unlocking
Step 3 : Unlock Huawei Mate 40 Pro Bootloader

In the third step of the process to root Mate 40 pro, it’s essential to unlock the phone’s bootloader. Remember, unlocking will result in a complete wipe of all device data. Therefore, it’s highly recommended to perform a comprehensive backup prior to this stage. Once you’ve secured your data, you can proceed by referring to our detailed guide on How to Unlock the Bootloader on your Mate 40 Pro.
Step 4 : Extract Boot.img from Huawei Mate 40 Pro Firmware
Then you have to download the firmware for your Huawei Mate 40 Pro. You have to download the same version that is currently installed on your device. After downloading, extract the file to a suitable location on your PC.
Now go to the extracted Firmware folder and see whether you can see the boot.img file. Just transfer this file to your phone and follow me.
Still Can’t find boot.img or Don’t know how to find it?
Step 5 : Patch Stock Boot.img via Magisk
- Firstly install the Magisk app on your phone. Read More: Everything about Magisk
- And confirm whether the boot.img has been transferred to the device.
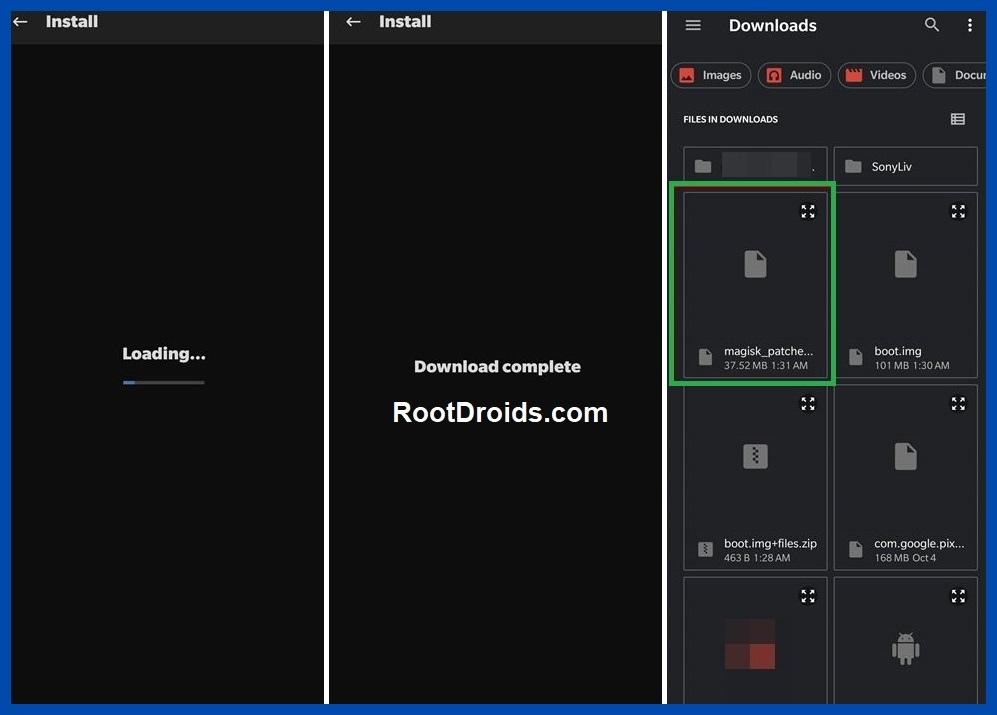
- Now tap on the Install button. (see below image)
- In the Options menu, enable both the Preserve Force Encryption and Recovery Mode options.
- Then tap Next.
- You will be navigated to the Method selection screen. Now choose Select and Patch a file.

- As the next step, browse to the extracted boot.img file and select it.
- Tap on the Let’s Go button and Magisk will now load the boot.img file and start patching.
- You will see a message saying Download Complete once the patching is done.
- Then the patched boot image file will be saved as magisk_patched.img in Internal Storage > Downloads.
- You can rename the file by deleting the random numbers at the end of the name. So the file will be named as magisk_patched.img.
- Finally, transfer the file to the internal storage of your device for future use.
Step 6 : Boot to Fastboot Mode on Huawei Mate 40 Pro
- Enable USB Debugging and connect your device to the PC using a USB cable.
- Now go to the platform-tools folder, type CMD in the address bar and press Enter. or Search CMD and open it. after that, navigate to the platform-tools folder
- That will launch the Command Prompt.
- Then type the following command in the CMD window to boot your device to Fast boot mode.
adb reboot bootloaderTo verify the connection, type in the below command. You should get the device ID followed by the Fastboot keyword. if you get a reply from the command prompt, it means, the connection has been successfully established.
fastboot devicesDisable DM Verity: Only if you have a problem with performing step 7.
Step 7
Flash Magisk Patched Boot.img and Root Mate 40 Pro
- First transfer the magisk_patched.img file to the platform-tools folder.
- Then type the following command in the CMD window to flash the Magisk Patched file.
fastboot flash boot magisk_patched.img- Finally, enter the following command to reboot your device to the OEM.
fastboot rebootNow, you have successfully rooted your device.
Conclusion
Rooting your Huawei Mate 40 Pro can significantly enhance your user experience, unlocking a plethora of features and customizations. This process, while technical, is made much simpler with the use of Magisk. Remember, while you root Mate 40 Pro, it’s important to follow each step carefully to avoid any potential damage to your device. By rooting, you gain complete control over your device’s system, giving you the freedom to customize and optimize your device to your liking. But always be cautious and informed about the risks involved. Happy rooting!
Frequently Asked Questions (FAQ)
Despite unrooting my mobile and using Magisk HIDE, apps still report my device as rooted. How can I fix this?

If your bootloader is unlocked, they will report your device as a rooted device. According to your description, Magisk Hide alone has failed to do the job. I suggest you try the “Repackage Magisk Manager” option in the Magisk Manager settings. It worked for me.
I’m facing boot loop and app crashes after uninstalling Magisk via TWRP. How can I fix this?
Q: I installed Magisk via TWRP(Temp version) and installed some modules. Thereafter, I decided to uninstall Magisk using the Magisk Manager APK. Then the phone rebooted and stuck into the phone logo with the red danger logo. I tried flashing Magisk again via Temp TWRP, but now a few apps keep crashing. I tried uninstalling and reinstalling them. But couldn’t fix it. Can you help me?
A: If your phone is stuck in the boot loop or apps still crashing, then you have to wipe the Dalvik cache again. If you still need to unroot for whatever reason you can try this:
- Update Magisk first and then click uninstall from Magisk Manager.
- manually flash uninstaller.zip from TWRP.
- flash the uninstaller as a module as stated in this post.
- Finally, if it’s still no use, then you can factory reset the device to remove the root.
What can I do if Magisk 16.3 keeps uninstalling itself?

Q: During the past 4 days I had to re-install Magisk 16.3 at least 4 times a day. Because it keeps uninstalling itself. I have previously experienced this issue with Magisk, but it has gotten worse instead of being solved.
A: After uninstalling, you can try flashing the stock boot image from your ROM/firmware package/factory image.
How can I resolve the MAGISK v16.0 installation failure message?
Q: I tried to install MAGISK v16.O using MAGISK installer. But there is a message saying, Installation failed with (! Unable to repack boot image! Failed! ! Installation failed). What can I do to get rid of this?
A: Just try uninstalling v15.3 first and then install v16.0 clean.
What should I do if I encounter an error while installing Magisk using TWRP on my device?
Q: I got this error when installing Magisk using TWRP. What am I supposed to do now?
Updater process ended with ERROR:1
Error installing zip file '/sdcard/MagiskManager/Magisk-v13.3.zip'
A: I advise you to use the magisk_uninstaller.zip first. From what I saw in your log, your boot. img is already patched by something else. Therefore, you need to install Magisk on your stock boot.img.
What are the steps to resolve OTA Update failure after rooting with Magisk on a device?
- To start you need to fully restore to stock and erase user data. (basically, the same as starting with a brand new phone).
- Then, flash Magisk (I used the image provided on the thread about Magisk) fastboot flash boot magisk_patched.img.
- Boot to Android.
- Next, install magisk manager.
- Verify root works.
- Now, reboot to bootloader, flash default boot.img: fastboot flash boot boot.img.
- Next, reboot to android.
- Finally, apply OTA update.
What can be done if MagiskHide or SafetyNet fails after an update?
If MagiskHide or SafetyNet starts failing after an update to either Magisk, the app, or both you can fix it by toggling MagiskHide off and on (also see ”Test MagiskHide”).
What can I do if Magisk isn’t working as expected, such as not detecting the installation or experiencing loss of root?
If you can boot up, but Magisk isn’t working as expected (not detecting the Magisk installation, loss of root, etc), there are a few troubleshooting steps you can try.
- First, Reboot. Sometimes this helps Magisk to mount everything as it should.
- Try removing any installed modules. So that you can see if it’s a faulty module causing issues.
- If that seems to fix it, just install the modules one at a time to find which one causes issues.
- If nothing else works, try starting from the very beginning with a new installation.
- check here: “Asking for help/reporting bugs”.
What does the message “Invalid image: not signed” in the install log mean?
In case you come across a notification in the install log stating “Invalid image: not signed” while attempting to root Mate 40 Pro, there’s no need for an alarm. This simply implies that your boot image isn’t signed, which is a typical occurrence in the process to root Mate 40 Pro. Rest assured, it’s completely normal and not a cause for concern.
What causes a “process error” when installing Magisk and how can it be fixed?
A “process error” when installing Magisk is usually caused when the app doesn’t have storage permission. So you can fix it by clearing app data.
Why can’t some users install or update the Magisk app or Magisk in the app v8+?
When attempting to install/update either the app or Magisk in the Magisk app v8+, some users experience that nothing happens. Usually, this is caused by having a custom hosts file, or similar, that is blocking the CDN used by the Magisk app (JSDelivr). The solution is to whitelist that particular URL.
Why can’t I root my Huawei Mate 40 Pro with Magisk even after following the step-by-step guide provided on the website?
If you are naive to rooting, you are at the right place. How about the people who are experienced in rooting? We are here to provide you with a root solution to every feature you were wishing for. Please go to the top of the website and try the step-by-step guide again.
Read More: Everything about Magisk
Did you find this guide on ‘How to Root Huawei Mate 40 Pro with Magisk without TWRP’ beneficial? If so, we encourage you to spread the word by sharing this article on Facebook, LinkedIn, and other platforms. We greatly appreciate your feedback. So, don’t hesitate to reach out with your questions, comments, or suggestions.
Feel free to join our active community and initiate a help topic under Android – it’s entirely free! Don’t forget to show your support by liking our Facebook page. Remember, if you’re looking to root Mate 40 Pro or any other Android device, we’re here to help. Thank you for your continued support! Have a fantastic day! 😊