Are you looking to unlock the full potential of your Huawei Y6s (2019) smartphone? Rooting your device can provide you with enhanced customization options, improved performance, and access to a plethora of exciting features. In this comprehensive guide, we will show you how to root Huawei Y6s using Magisk, without the need for TWRP recovery. Whether you want to install custom ROMs, remove bloatware, or enjoy powerful root-only apps, this tutorial will walk you through the process step by step. Read More – Does Rooting or Unlocking void your Android Phone Warranty
Huawei Y6s rooting gives you complete control over your device, allowing you to optimize its performance and personalize your Android experience. By gaining root access, you can unlock hidden features, remove pre-installed apps, and even boost your device’s battery life. This guide will show you how to root your Huawei Y6s using Magisk, one of the most popular and reliable rooting methods available. Unlike traditional methods that require TWRP recovery, Magisk offers a seamless and hassle-free way to root your device. So, let’s dive in and explore how you can unlock the full potential of your Huawei Y6s without any complicated procedures. Read More – 30 Amazing Things You Can Do After Rooting Your Android
Why are we waiting? Let’s get into business.
Table of Contents
Prerequisites for Rooting Your Huawei Y6s with Magisk
Before we delve into the rooting process, there are a few prerequisites you must fulfill to ensure a successful Huawei Y6s root:
- Backup your Device: Rooting your device may wipe all your data. Hence, it’s crucial to create a full backup of your Huawei Y6s before proceeding.
- Charge your Device: Ensure that your Huawei Y6s is at least 70% charged to prevent any accidental shutdowns in the middle of the process.
Remember, each of these steps is crucial for the successful rooting of your Huawei Y6s. Skipping any of these steps may lead to failure in obtaining root access or may even brick your device. Proceed with caution and at your own risk.
Steps To Root Huawei Y6s (2019) using Magisk Patched Boot.img
To ensure a smooth and successful rooting process for your Huawei Y6s, it is crucial to follow the instructions provided in this guide without skipping any steps. Please note that while we strive to provide accurate and reliable information, we cannot take responsibility for any potential issues that may arise during the rooting process. With that in mind, let’s proceed with the step-by-step instructions to root Huawei Y6s and unlock its full potential. Read More – The First 10 Things to Do After Rooting your Device
Step 1 : Install Android SDK

Firstly you need to install the Android SDK Platform Tools on your PC. As some of you are already aware this is the recommended official ADB and Fastboot binary given by Google. Just download it and extract it to any convenient location on your PC. Then you will have the platform-tools folder, which is essential for the process.
Step 2 : Enable USB Debugging and OEM Unlocking on Huawei Y6s (2019)
Then you should enable USB Debugging and OEM Unlocking on your Huawei Y6s (2019). By unlocking OEM, you will be able to make your phone discoverable by the PC in ADB mode. And then allowing you to boot your device to Fastboot Mode.
Here’s how you gonna do that. : Enable USB Debugging and OEM Unlocking
Step 3: Unlock Huawei Y6s (2019) Bootloader

As the third step, you need to unlock the bootloader of the phone. Don’t ever forget that unlocking will wipe all the device data. So, perform a complete backup beforehand and then refer to our guide on How to Unlock the Bootloader on Huawei Y6s (2019).
Step 4 : Extract Boot.img from Huawei Y6s (2019) Firmware
Then you have to download the firmware for your Huawei Y6s (2019). You have to download the same version that is currently installed on your device. After downloading, extract the file to a suitable location on your PC.
Now go to the extracted Firmware folder and see whether you can see the boot.img file. Just transfer this file to your phone and follow me.
Still Can’t find boot.img or Don’t know how to find it?
Step 5 : Patch Stock Boot.img via Magisk
- Firstly install the Magisk app on your phone. Read More: Everything about Magisk
- And confirm whether the boot.img has been transferred to the device.
- Now tap on the Install button. (see below image)
- In the Options menu, enable both the Preserve Force Encryption and Recovery Mode options.
- Then tap Next.
- You will be navigated to the Method selection screen. Now choose Select and Patch a file.
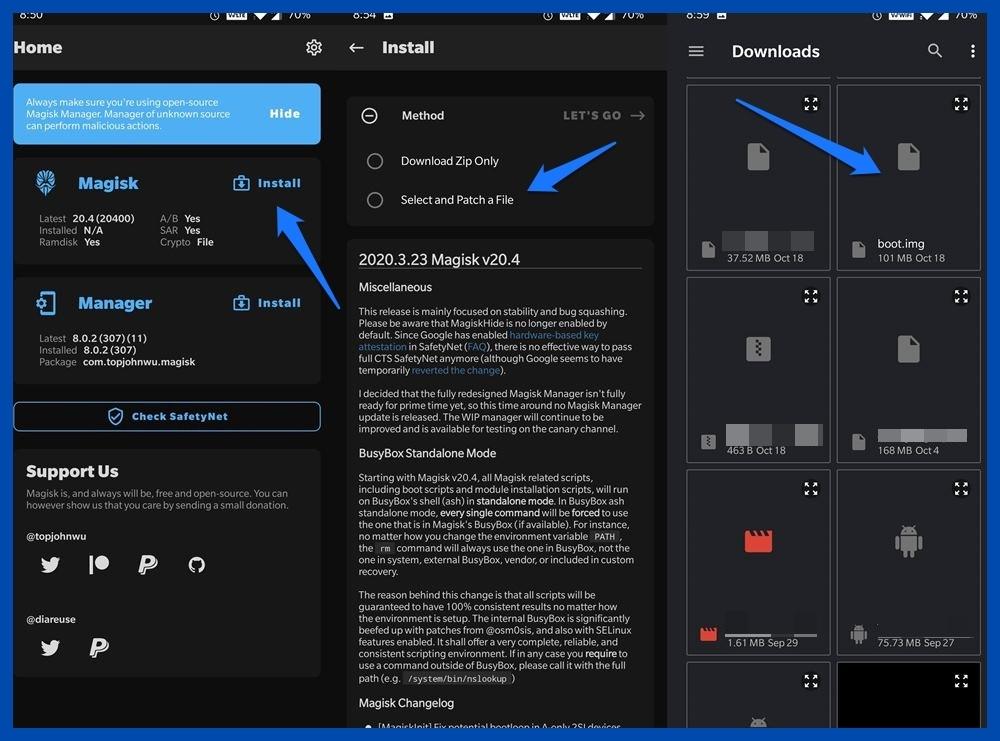
As the next step, browse to the extracted boot.img file and select it.
- Tap on the Let’s Go button and Magisk will now load the boot.img file and start patching.
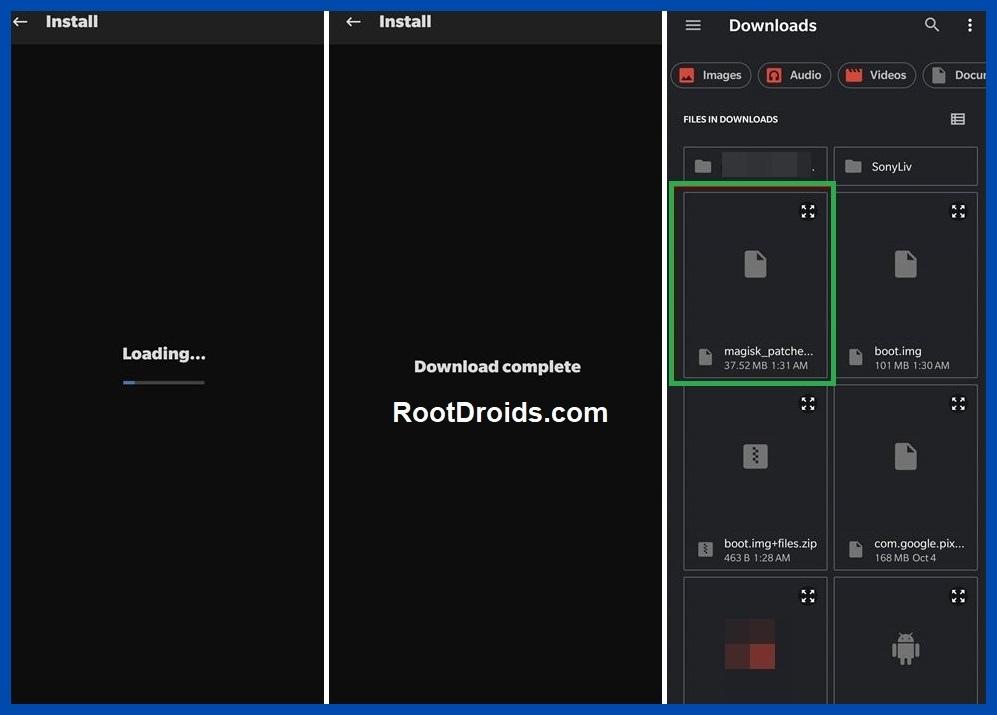
- You will see a message saying Download Complete once the patching is done.
- Then the patched boot image file will be saved as magisk_patched.img in Internal Storage > Downloads.
- You can rename the file by deleting the random numbers at the end of the name. So the file will be named as magisk_patched.img.
- Finally, transfer the file to the internal storage of your device for future use.
Step 6 : Boot to Fastboot Mode on Huawei Y6s (2019)
- Enable USB Debugging and connect your device to the PC using a USB cable.
- Now go to the platform-tools folder, type CMD in the address bar and press Enter. or Search CMD and open it. after that, navigate to the platform-tools folder
- That will launch the Command Prompt.

- Then type the following command in the CMD window to boot your device to Fast boot mode.
adb reboot bootloaderTo verify the connection, type in the below command. You should get the device ID followed by the Fastboot keyword. if you get a reply from the command prompt, it means, the connection has been successfully established.
fastboot devicesDisable DM Verity: Only if you have a problem with performing step 7.
Step 7 : Flash Magisk Patched Boot.img and Huawei Y6s Rooting
- First transfer the magisk_patched.img file to the platform-tools folder.
- Then type the following command in the CMD window to flash the Magisk Patched file.
fastboot flash boot magisk_patched.img- Finally, enter the following command to reboot your device to the OEM.
fastboot rebootNow, you have successfully rooted your device.
Verifying Systemless Root
How can you confirm if your Huawei Y6s rooting has been successfully completed using a systemless root method?
To do this, you’ll need to download and install the Magisk Manager app APK on your device, and then launch the application.
To ascertain that your device has been properly rooted in a systemless manner, look at the top of the screen after launching the app. If you notice that all the options are marked with a green checkmark, congratulations! This indicates that you’ve accomplished a successful root and have managed to bypass SafetyNet.

Conclusion
And there you have it – a comprehensive guide on how to do Huawei Y6s rooting using Magisk without the need for TWRP recovery. By diligently following these instructions, you should now have full control over your device, opening up a world of customizations, improved performance, and more. The potential of your Huawei Y6s has been unlocked and it’s time to explore the new possibilities this brings.
However, it’s important to remember that rooting comes with its own set of risks, including potentially voiding your warranty. It’s critical to proceed with caution, ensuring you understand what rooting entails and are comfortable with the process. Regularly backing up your data is a must, as is staying informed about the latest updates within the rooting community.
We hope you found this guide helpful for successfully achieving Huawei Y6s root. If you have any further questions or need more help, don’t hesitate to reach out to experts in the rooting community or explore relevant online forums. Enjoy your newly rooted device!
Frequently Asked Questions (FAQ)
Why do apps still detect my phone as rooted after complete unrooting and re-rooting with Magisk HIDE?

This issue could be due to some leftover files or traces from the previous root that are causing certain apps to detect your device as still being rooted. Here’s how you can potentially fix this:
- Clear App Data: For the apps that are detecting your device as rooted, try clearing their cache and data. You can do this by going to Settings > Apps, select the app, and then choose ‘Storage’ > ‘Clear Cache’ and ‘Clear Data’.
- Uninstall and Reinstall Apps: If clearing the cache and data doesn’t work, try uninstalling and then reinstalling the apps that are detecting the root.
- Use MagiskHide: In your Magisk Manager app, use the MagiskHide feature to hide the root from certain apps. Go to Magisk Manager > Menu > Magisk Hide, and then select the apps from which you want to hide the root.
- Factory Reset: If all else fails, you may need to perform a factory reset. This will erase all data on your device and return it to its original factory settings. Ensure you backup any important data before doing this.
Remember, rooting your device can have unexpected consequences, and some apps have sophisticated methods to detect rooting. It’s always important to be aware of the risks and take precautions like backing up your data.
Why does Huawei Y6s (2019) got stuck at boot after uninstalling Magisk from app
If your Huawei Y6s (2019) is stuck at boot after uninstalling Magisk from the app, it may be due to the incorrect uninstallation process or some residual files interfering with the boot process. Here are some steps you can try to resolve this issue:
- Force Restart: Sometimes, a simple force restart can solve the issue. Press and hold the power button for about 10-15 seconds until the device restarts.
- Enter Safe Mode: Boot your device into safe mode. If your device boots up successfully in this mode, it means a third-party app could be causing the issue. You can then uninstall suspected apps one by one to identify the culprit.
- Factory Reset: If the above methods fail, you may need to perform a factory reset. This will erase all data and bring your device back to its original settings. Before performing a factory reset, try to backup your data if possible.
- Flash Stock Firmware: As a last resort, you may need to flash the stock firmware on your device again. This should definitely solve the problem, but it’s a more advanced process. If you’re not confident doing it yourself, consider seeking help from a professional or a service center.
Remember, it’s always important to follow the correct process when uninstalling root methods like Magisk to avoid such issues. Always make sure to have a good backup of your data before making such significant changes to your device.
Why Does Magisk keeps uninstalling?
If Magisk continues to uninstall itself, it could be due to several reasons:
- Outdated Magisk Manager or Magisk: Ensure you have the latest versions of both the Magisk Manager app and Magisk itself. Updates often come with bug fixes that can resolve this issue.
- Incompatible Apps: Some apps or system updates on your device can interfere with Magisk, causing it to uninstall. Check if the issue started after installing or updating an app.
- Device Compatibility: Not all devices are compatible with Magisk, and incompatibility can lead to issues like frequent uninstallation.
- Incorrect Installation: If Magisk was not installed correctly, it might keep uninstalling itself. Try reinstalling it and ensure you follow the proper installation steps.
- System Updates: If your device has recently been updated, it’s possible that the system update is causing Magisk to uninstall. You may need to root your device again after system updates.
If you’ve tried all these solutions and none have worked, consider seeking advice from the Magisk community or a professional.
How to fix Unable to repack boot image error in Magisk?
The “Unable to repack boot image” error in Magisk is usually due to an incompatible or corrupted boot image. Here are a few solutions to fix this issue:
- Update Magisk: Ensure you’re using the latest version of Magisk. An outdated version may not support your current boot image, leading to this error.
- Reflash Boot Image: If you’re using a custom ROM, try reflashing the boot image. Make sure to use the correct image file for your device model and ROM.
- Use Patched Boot Image: Instead of direct installation, try using the ‘Patch Boot Image’ method. Download the correct boot image for your device, patch it using Magisk Manager, and then flash it using Fastboot.
- Check Storage Space: Make sure your device has enough storage space. If your device is running out of space, it may cause this error.
- Factory Reset: As a last resort, consider doing a factory reset. Make sure to back up your data before proceeding with this step.
Remember, modifying your device’s boot image can be risky. If you’re unsure about any of these steps, it’s best to seek help from a professional or experienced community member.
How can I fix the OTA Update failing after using Magisk Root?
- To start you need to fully restore to stock and erase user data. (basically, the same as starting with a brand new phone).
- Then, flash Magisk (I used the image provided on the thread about Magisk) fastboot flash boot magisk_patched.img.
- Boot to Android.
- Next, install Magisk Manager.
- Verify root works.
- Now, reboot to bootloader, flash default boot.img: fastboot flash boot boot.img.
- Next, reboot to Android.
- Finally, apply the OTA update.
Magisk isn’t working. How To Fix?
If you can boot up, but Magisk isn’t working as expected (not detecting the Magisk installation, loss of root, etc), there are a few troubleshooting steps you can try.
- First, Reboot. Sometimes this helps Magisk to mount everything as it should.
- Try removing any installed modules. So that you can see if it’s a faulty module causing issues.
- If that seems to fix it, just install the modules one at a time to find which one causes issues.
- If nothing else works, try starting from the very beginning with a new installation.
- check here: “Asking for help/reporting bugs”.
Why does the “Invalid image: not signed” message appear?
If you see a message in the install log, indicating “Invalid image: not signed”, that means your boot image is not signed. Don’t panic! It’s perfectly normal and nothing to worry about.
Do you think this guide on How to Root Huawei Y6s (2019) Device using Magisk Patched Boot.img is helpful? If so, please share this article on Facebook, LinkedIn, etc. And we warmly welcome your queries, comments, and suggestions. Feel free to contact us.
You can join our community and open help Topic under Android.
It’s totally free! And, please don’t forget to like our Facebook page. Thank you very much! Have a nice day! 😊